

28/400 and 28/410 are not interchangeable. They share a 28mm nominal diameter but use different thread profiles, and swapping one for the other causes false-tight sealing failures and production-line problems that surface after your product is already in distribution. Here is your three-step action plan right now:
- Pull the finish code from both your bottle drawing and your closure drawing. Confirm it reads 28-400 or 28-410, not just "28mm."
- Request physical samples from your supplier and run a fit check, liner seating inspection, and torque measurement before approving anything.
- Hold production until a pilot run verifies torque consistency and liner compression on your actual capping line.
The rationale is mechanical: the 400 and 410 series differ in thread height and engagement turns, so a mismatched cap can reach a mechanical stop before the liner ever contacts the sealing land.
Table of Contents
- What do the numbers in a finish code actually mean?
- Why the 400 vs 410 difference creates real business risk
- How to verify compatibility before you place a production order
- What to include in RFQs and purchase orders to get the right finish
- How to run a pilot that actually validates your bottle-cap pair
- Diagnosing a finish mismatch when it shows up on the line
- How Sarawest USA helps brands manage finish compatibility
- Key Takeaways
- The finish code problem is bigger than most brands expect
- Sarawest USA can validate your closures and run your pilot
- Useful sources and documents to request from suppliers
What do the numbers in a finish code actually mean?
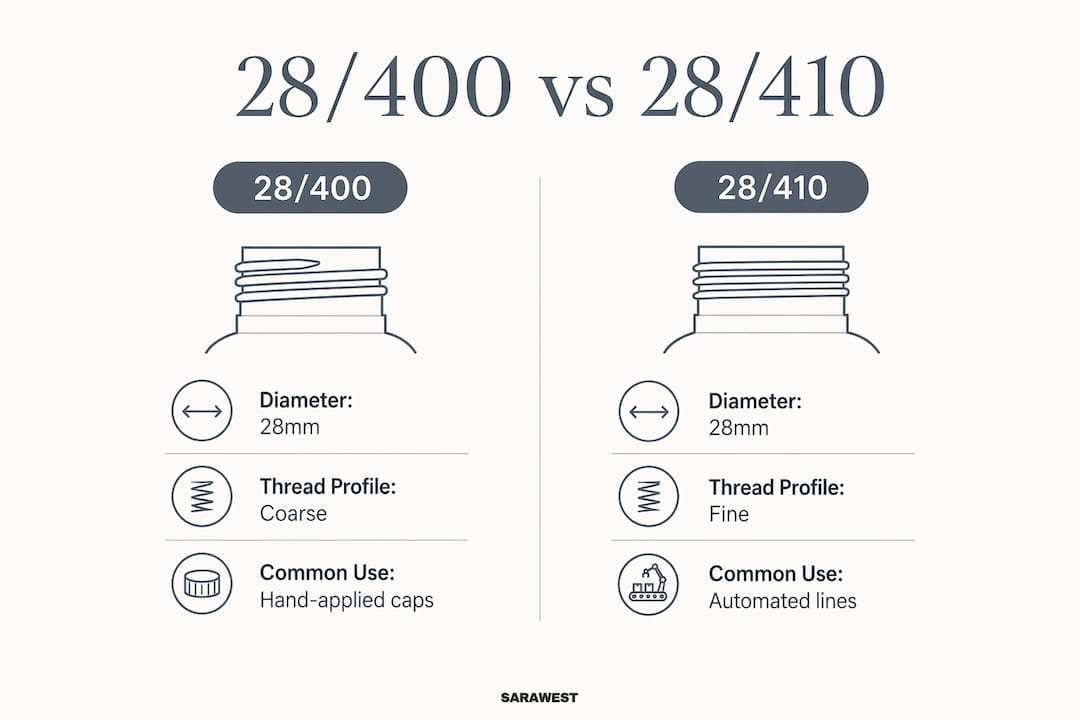
The code is a two-part shorthand. The first number, 28, is the T dimension: the outer diameter of the bottle's threaded neck, measured in millimeters. The second number, 400 or 410, identifies the thread series, which encodes thread height, pitch, and the number of turns required to fully seat a closure.
- 400 series: roughly one full turn of continuous thread. Shorter thread height, less vertical engagement. Historically designed for glass packaging.
- 410 series: roughly 1.5 turns of continuous thread. Taller profile, more vertical engagement. The standard for blow-molded plastic bottles and dispensing accessories.
| Dimension | What it measures | Typical value (28-size) |
|---|---|---|
| T | Thread outer diameter | 28 mm |
| E | Outer neck diameter (excluding threads) | — |
| H | Neck height (top to shoulder) | 7–10 mm |
| I | Inner neck diameter | — |
| Thread turns | Engagement rotations to seat | 1 (400) / 1.5 (410) |
Two finishes can share the same "28" and still be incompatible in production. That is the core problem with shorthand ordering.
Why the 400 vs 410 difference creates real business risk
Thread engagement is not just a label. The taller 410 profile provides additional travel before the liner seats, which matters enormously on automated capping lines and for dispensing accessories under mechanical stress. When the series is wrong, you get:
- False tight: the cap threads bottom out before the liner contacts the sealing land. The torque wrench reads "done," but the seal is open.
- Inconsistent liner compression: partial contact produces variable sealing force across a production run, meaning some units pass and others fail.
- Leak risk after distribution: temperature cycling and vibration during shipping expose the incomplete seal. Hidden leaks appear after the product has left your facility.
- Pump and dispenser disengagement: pumps and disc-tops are built around 410 compliance. A 400-finish bottle requires an adapter or a different bottle entirely; without one, the pump can disengage under normal actuation force.
- Capping-line jams and torque variance: automated chucks calibrated for one thread series produce inconsistent application torque when the series changes mid-run.
Ordering to "28mm" alone is the most common source of this friction. Nominal diameter alone does not define thread pitch, height, or turns. Procurement teams that shorthand the spec cause misorders, vendor confusion, and production delays that cost far more than a proper sample check would have.
Scenario A: A brand moves from a 500-unit bench pilot to a 10,000-unit automated run. The pilot used hand-applied caps; the production line uses a rotary capper. The 28-400 caps that felt fine by hand bottom out 0.3 turns early on the capper chuck, producing torque spikes and a 12% leak rate on the first pallet.
Scenario B: A cleaning product ships in summer. The 28-400 cap on a 28-410 bottle passed a static bench leak test at room temperature. After two days in a hot trailer, thermal expansion shifts the liner contact point and 8% of units arrive leaking.
How to verify compatibility before you place a production order
Start with the drawings, not the physical parts. Pull the finish drawing for both the bottle and the closure and confirm the full code, T dimension, H dimension, and thread turn count match. If either document says only "28mm," treat that as incomplete and request the full specification.

Step 1: Physical sample fit check
Thread the closure onto the bottle by hand. It should engage smoothly, require the expected number of turns to seat, and stop with the liner visibly compressed against the sealing land. Any early stop, wobble, or cross-threading is a red flag.
Step 2: Torque and liner compression measurement
Use a calibrated torque meter to apply and remove the closure. Map the torque curve: application torque should rise steadily and peak at full liner contact, not spike early. Measure liner compression directly with a depth gauge or by sectioning a sealed sample. Acceptance starting points to negotiate with your supplier: application torque within the closure manufacturer's specified range, liner compression at or above the liner supplier's minimum contact width.
Step 3: Leak and retention testing
Run a static leak test (vacuum or pressure decay) on a statistically meaningful sample set. For dispensing closures, add a pump retention test: cycle the pump through its rated actuation count and confirm the closure does not back off. A capillary test on the sealing land catches micro-leaks that pressure tests miss.
Step 4: Capping-line dry run
Run your validated bottle-cap pair through the actual capping line at production speed. Log torque readings across the run. Variance beyond your agreed tolerance band means the line setup needs adjustment before you approve the order.
What to include in RFQs and purchase orders to get the right finish
Vague specs produce vague results. Every RFQ and purchase order for bottles or closures should include:
- Full finish code: 28-400 or 28-410. Never "28mm."
- Drawing reference: revision-controlled drawing number with T, E, H, S, and I dimensions called out.
- Material: glass or plastic (blow-molded resin type if relevant). Glass typically uses 400-series finishes; plastic blow-molded bottles overwhelmingly use 410.
- Closure family: flat-top continuous thread cap vs. dispensing closure (pump, disc-top, trigger sprayer). If dispensing, confirm 410 compliance or adapter requirement.
- Liner type and compression target: liner material (F217, PE foam, PTFE, etc.) and minimum contact width.
- Capping torque range: application and removal torque in inch-pounds, referenced to your capping-line setup.
- Sample requirement: minimum sample count, dimensional inspection report, torque test log, and signed pass/fail criteria.
- Traceability: supplier lot ID and a signed dimensional compliance statement for each production lot.
GPI finish numbering is harmonized with ASTM/ISO tolerances, but QC lapses happen. Requiring dimensional inspection certificates on every lot is your protection.
How to run a pilot that actually validates your bottle-cap pair
A pilot is not a formality. It is the only way to confirm that your specific bottle, closure, liner, and capping line work together at production speed.
Pilot objectives: confirm dimensional conformance, sealing performance, and capping-line throughput before committing to a full production run. Include packaging engineering in the test plan from day one. Small changes in plastic shrinkage or glass mold dimensions can affect automated capping performance at scale.
Minimum sample sizes: for a small-batch validation pilot, a starting point of 50–100 sealed units gives enough data for torque mapping and leak testing. For a production validation run ahead of a full order, 500+ units run at production speed is a more defensible sample.
Tests to run and suggested frequency:
- Dimensional inspection of bottle finish and closure (every lot, 100% on pilot)
- Torque curve mapping (every capping-line setup and after any changeover)
- Liner compression measurement (minimum 10% of pilot units, sectioned)
- Static leak test, vacuum or pressure decay (100% of pilot units)
- Drop and vibration sub-test (minimum 5 units per condition)
- Pump actuation cycles for dispensing closures (full rated cycle count on 10 units)
- Capping-line throughput trial at target speed (full pilot run, log torque variance)
Acceptance criteria template: pass requires zero leaks on static test, torque readings within the agreed band on 95% or more of units, and no pump disengagement during actuation cycling. Any result outside tolerance triggers a corrective action request to the supplier and a production hold. Pilot results feed directly into your RFQ language and become the acceptance baseline for every subsequent lot.
Diagnosing a finish mismatch when it shows up on the line
The symptoms are recognizable once you know what to look for.
- Cap feels tight but leaks: classic false-tight condition. Threads bottomed out before liner seated. Quarantine the lot immediately.
- Inconsistent removal torque across a pallet: thread engagement varying unit to unit. Check finish dimensions on a sample of bottles and closures from that lot.
- Pump backs off during actuation: 400-finish bottle with a 410-spec pump. The pump collar is not getting full thread engagement.
- Capping-line torque spikes: wrong series on the chuck setup. Stop the line, verify finish code on the current bottle lot.
Immediate remediation steps for line operators:
- Quarantine all suspect units. Do not release to distribution.
- Switch to supplier-matched closures if available in inventory.
- Add tamper-evident bands as a temporary containment measure.
- Schedule an expedited pilot run with the correct finish pair before restarting full production.
- Escalate to supplier corrective action if dimensional inspection confirms the finish is out of spec. Hold shipments until the supplier provides a conforming lot with a signed inspection certificate.
How Sarawest USA helps brands manage finish compatibility
Finish compatibility is a packaging engineering problem as much as a chemistry problem. Sarawest USA's in-house team handles both sides. Our contract manufacturing services include packaging validation as part of the pilot-to-scale workflow, not as an afterthought.
- In-house R&D chemists and packaging engineers who work the bottle-cap pair into the formulation brief from the start.
- Physical pilot runs starting at 1,000-unit minimums, with torque mapping, liner compression checks, and leak testing built into the protocol.
- Dimensional inspection support to confirm finish codes match drawings before production begins.
- Pilot-to-scale production management from bench to full truckload, with documented acceptance criteria at every stage.
- A library of 1,200+ proprietary formulas across eight industries, each paired with validated packaging specifications our team has already tested.
Our pilot-to-scale case studies show what this looks like in practice. When you bring a new product to us, we do not hand you a cap and a bottle and wish you luck. We verify the pair works before a single production unit ships.
Key Takeaways
28/400 and 28/410 closures share a diameter but use different thread profiles, and that difference determines whether your product seals, ships, and sells without failure.
| Point | Details |
|---|---|
| Not interchangeable | 28-400 and 28-410 share a 28mm diameter but differ in thread turns (1 vs 1.5) and cannot be swapped without risking seal failure. |
| Always specify the full code | "28mm" alone is incomplete; every RFQ and PO must state 28-400 or 28-410 plus material (glass or plastic). |
| False-tight is the hidden risk | A mismatched cap can thread on and feel secure while the liner never contacts the sealing land, causing leaks after shipping. |
| Pilot before you scale | Run torque mapping, liner compression, and a static leak test on 50–100 units minimum before committing to a full production order. |
| Sarawest USA validates the pair | Sarawest USA runs packaging validation pilots from 1,000 units with in-house dimensional inspection and torque testing included. |
The finish code problem is bigger than most brands expect
Most brands discover the 28/400 vs 28/410 distinction the hard way: a pallet of leaking product, a capping-line shutdown, or a pump that backs off in the customer's hand. What frustrates me about this is that the information is not hidden. The finish code is printed on every supplier drawing. The problem is that procurement teams, under deadline pressure, shorthand it to "28mm" and assume the rest is obvious.
It is not obvious. The thread series is the part that locks compatibility, and it changes how quickly a cap bottoms out, how the liner compresses, and whether a dispensing closure will hold under real-world mechanical stress. The brands that get this right are the ones that treat the pilot run as a non-negotiable step, not a box to check. They include packaging engineering in the conversation before the formula is finalized, not after the bottles have already been ordered.
One thing I would add that most guides skip: always request liner seating photographs and torque curve plots with your sample submissions. A torque number alone tells you the peak. The curve tells you whether the cap seated progressively or hit a wall early. That shape is the real diagnostic.
Sarawest USA can validate your closures and run your pilot
Brands that get finish compatibility right do it with a manufacturing partner who treats packaging validation as part of the job, not a separate engagement. Sarawest USA brings in-house R&D, physical pilot runs from 1,000 units, and documented torque and leak testing to every production project. We scale from pilot minimums to full truckloads, and we have done it across commercial cleaning, sports care, equine products, solar care, and more.
If you are preparing to move a product from development to production, the right time to validate your finish pair is before the order, not after. Request samples or submit an RFQ through our contract manufacturing page. A real person reads every one.
Useful sources and documents to request from suppliers
Build your verification file before you approve any production order. Request these documents from every bottle and closure supplier:
- Finish drawings with T, E, H, S, and I dimensions called out to GPI/ASTM tolerances, revision-controlled.
- Dimensional inspection reports for the specific production lot, signed by the supplier's QC team.
- Torque curve logs from the supplier's application testing, showing the full curve, not just the peak value.
- Liner compression measurements from sealed sample sections, referenced to the liner manufacturer's minimum contact specification.
- Leak-test protocols used by the supplier, including test method (vacuum, pressure decay, or capillary), sample size, and pass/fail criteria.
For deeper reading on finish codes and GPI standards, the Container and Packaging neck finish guide and the Cary Company neck finish reference are solid starting points. For Sarawest USA's pilot-to-scale work across product categories, our case studies page documents real production transitions from bench to full-run manufacturing.